Hey there! If you’re looking to keep your support team in the loop whenever a Mailchimp email campaign encounters a bounce, you’re in the right place. In this guide, I’ll walk you through setting up an automated system using Make (formerly Integromat), Mailchimp, and Slack. This setup will ensure that your team gets instant Slack notifications whenever an email bounces, allowing for prompt action. Let’s dive in!
Introduction
Email bounces can be a headache, especially when they go unnoticed. By integrating Mailchimp with Slack through Make, you can automate the process of alerting your support team about these bounces. This not only saves time but also ensures that issues are addressed promptly, maintaining your sender reputation and improving overall email deliverability.
Step-by-Step Guide
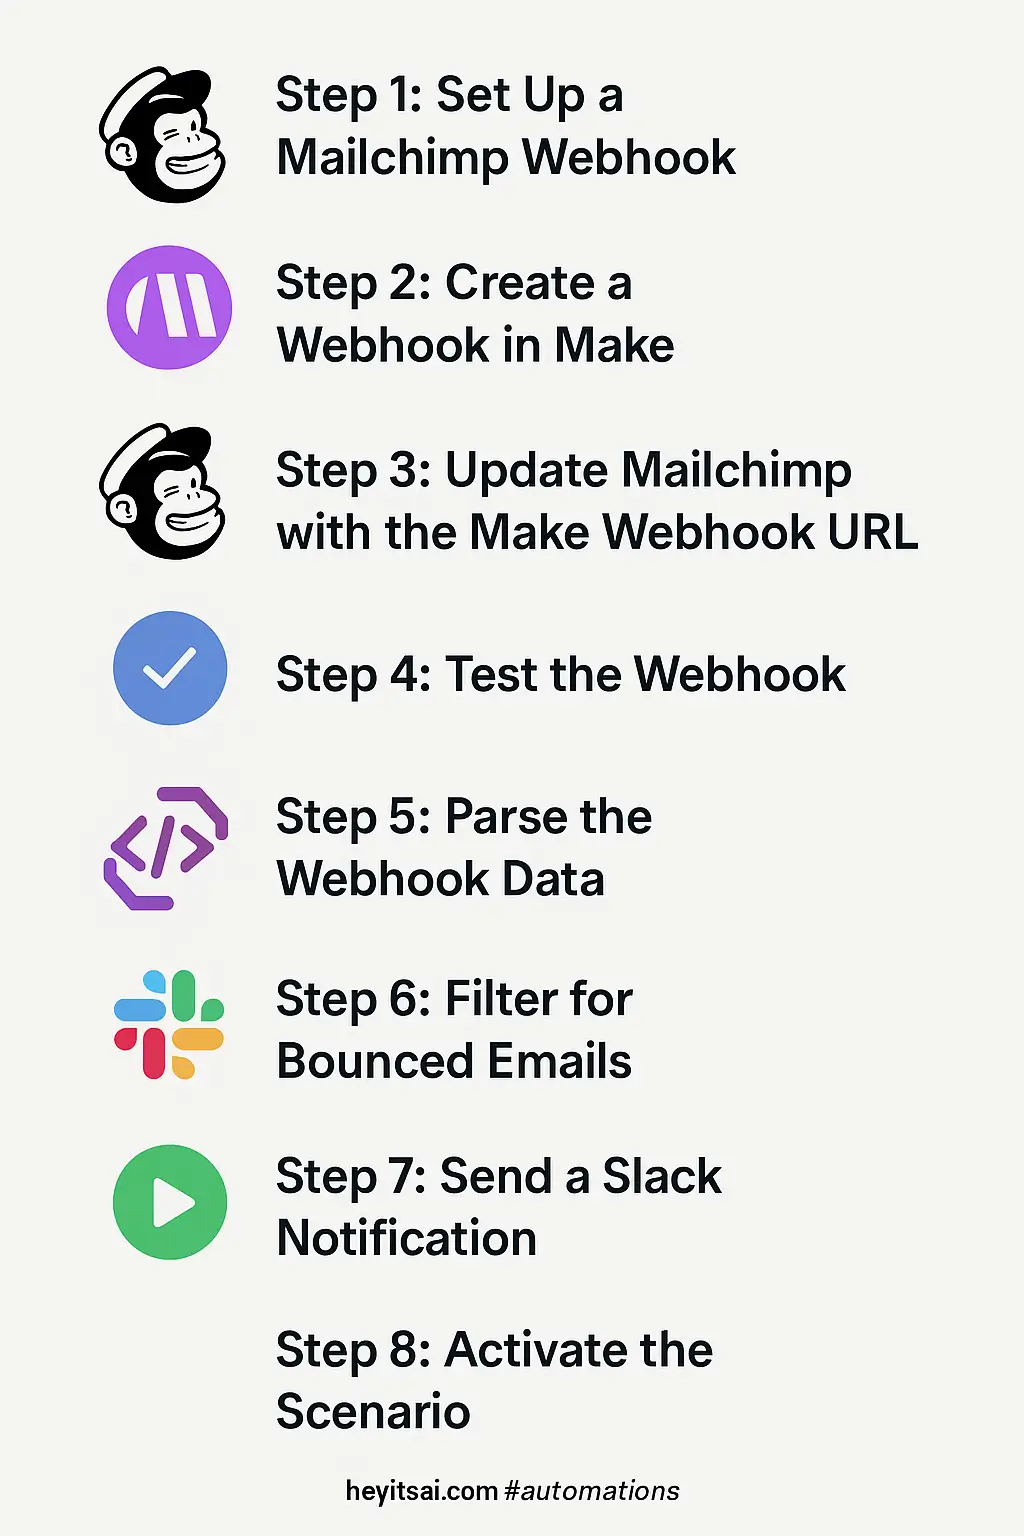
Step 1: Set Up a Mailchimp Webhook
First, we’ll configure Mailchimp to send data to Make whenever an email bounces.
- Log in to Mailchimp: Access your Mailchimp account.
- Navigate to Audience Settings: Go to Audience > All contacts. Choose the audience you want to monitor.
- Access Webhooks: Click on Settings > Webhooks.
- Create a New Webhook: Click the Create New Webhook button.
- Set the Callback URL: For now, enter a placeholder URL (we’ll update this later with the Make webhook URL).
- Select Events: Under What type of updates should we send?, select Unsubscribes and Cleaned. This ensures Mailchimp sends data when an email bounces.
- Save the Webhook: Click Save.
For more details on setting up Mailchimp webhooks, refer to their official documentation.
Step 2: Create a Webhook in Make
Next, we’ll set up a webhook in Make to receive data from Mailchimp.
- Log in to Make: Access your Make account.
- Create a New Scenario: Click on Create a new scenario.
- Add a Webhook Module: Click the + button, search for Webhooks, and select the Custom Webhook module.
- Set Up the Webhook: Click Add, name your webhook (e.g., “Mailchimp Bounce Webhook”), and click Save.
- Copy the Webhook URL: After saving, Make will provide a unique webhook URL. Copy this URL.
Step 3: Update Mailchimp with the Make Webhook URL
Now, we’ll link Mailchimp to Make using the webhook URL.
- Return to Mailchimp: Go back to the webhook settings you configured earlier.
- Edit the Webhook: Click on the webhook you created and replace the placeholder URL with the Make webhook URL you copied.
- Save Changes: Click Save.
Step 4: Test the Webhook
Before proceeding, let’s ensure the webhook is working correctly.
- Trigger a Bounce: Send a test email to an invalid address to generate a bounce.
- Check Make: In your Make scenario, click Run once. If everything is set up correctly, you should see data from Mailchimp appear in Make.
Step 5: Parse the Webhook Data
We’ll now extract relevant information from the webhook data.
- Add a JSON Parser Module: In your Make scenario, click the + button, search for JSON, and select the Parse JSON module.
- Configure the Module: Set the Data field to the Body output from the Webhook module.
Step 6: Filter for Bounced Emails
We only want to proceed if the event is a bounce.
- Add a Filter: Click the wrench icon between the JSON module and the next module you’ll add.
- Set Filter Conditions: Name the filter (e.g., “Only Bounces”) and set the condition to: type [equals] cleaned.
Step 7: Send a Slack Notification
Finally, we’ll send a notification to Slack.
- Add a Slack Module: Click the + button, search for Slack, and select the Create a Message module.
- Connect to Slack: If you haven’t already, connect your Slack account to Make.
- Configure the Module:
- Channel: Select the Slack channel where you want to send the notification.
- Text: Craft your message. For example:
“🚨 Mailchimp Bounce Alert 🚨\n\nAn email to {{email}} has bounced.\n\nCampaign: {{campaign_name}}\n\nPlease investigate.”
Replace {{email}} and {{campaign_name}} with the appropriate fields from the parsed JSON data.
Step 8: Activate the Scenario
Once everything is set up:
- Save the Scenario: Click Save.
- Turn it On: Toggle the scenario to the On position.
And that’s it! Your support team will now receive Slack notifications whenever a Mailchimp email bounces.
Optional Enhancements
Want to take it a step further? Here are some quick-win ideas:
- Log Bounces in a Spreadsheet: Add a Google Sheets module to log each bounce for record-keeping.
- Notify Specific Team Members: Instead of a channel message, send a direct message to specific team members.
- Include Bounce Reasons: If available, include the bounce reason in the Slack notification for more context.
By setting up this automation, you’re ensuring that your team stays informed about email bounces in real-time, allowing for swift action and improved email performance. Happy automating!